
The Maserati side cover before work starts.

Major scratches removed with 80 grit and then finished with 240.

I had polished it on the mop on this shot but hopefully you can see the results of not taking out the deeper scratches properly. It's nearly all nice and shiney but with some obvious deep scratches - this is what happens if you skip the early stages.
Quite a few people have asked me about polishing aluminium, mainly folk ask about how I got the engine casings on my Kawasaki GPZ1100 chopper so shiney. Well I am no expert in this field and I have seen others do a better job than me but I can talk a bit about how I do it and get satisfactory results for virtually no cost and not too much hard work.
The first thing to do is to look at the job and work out what needs doing - the first thing is to see if it already has paint or lacquer on it - most things will as aluminium corrodes quite quickly without any form of protection. It is important to get rid of that before going any further, I use a proprietary paint stripper, there are some pretty good ones now that are less harmful to the environment than older chemical preparations, I don't recommend any particular brand.
Give it a good wash in clean water after any protective coating has been stripped, the next step will depend on the condition of the newly exposed aluminium. Now is the right time to deal with and deep dings or scratches, use progressively finer grades of files and wet and dry sandpaper so you end up with a clean, ding free surface. I work up to about a 2000 grit so I am left with a smooth but dull surface, which needs to be uniform. This stage can be time consuming but it makes the finished article much better. Some folk prefer to use Scotchbrite or similar abrasives, the choice is yours but the point about using progressive grades remains true. I have tried to illustrate the reasons in the photos, I hope it becomes obvious.
Next stage is where things start to get exciting as it's the first time you see a highly reflective finish. I highly recommend a machine polisher here, it takes ages doing it by hand and only a few seconds with a high speed polishing wheel. I use a bench grinder fitted with a cotton polishing wheel - they are only a few pounds to buy and last well. You can get really coarse wheels, I don't use one as the work with the wet and dry has already done the hard lifting. It is important to use a wax compound at this stage - I use a red bar to start with, I believe it is that colour as it is wax with jeweller's rouge in it. Work the surface evenly, it will quickly come up to a bright shine. Don't use too much pressure, let the speed of the grinder do the work.
it should like very shiney now but an even better finish can be obtained by now going to a different wax, I use a white wax bar to get my final bit of high speed polishing done. A final rub over with a micro fibre cloth is all that is needed to get that fresh out of the factory polished look.

Here I have gone back and had another go at the deeper scratches with 800 and then 2000 grit wet and dry used wet. It has then gone back to the mop for a bit more work. This is as far as I am going as I don't want my 1958 bike to look like a 2023 bike. I want it to look like it did when it came out of the factory - not over done, somebody else can do that in the future if they want to.
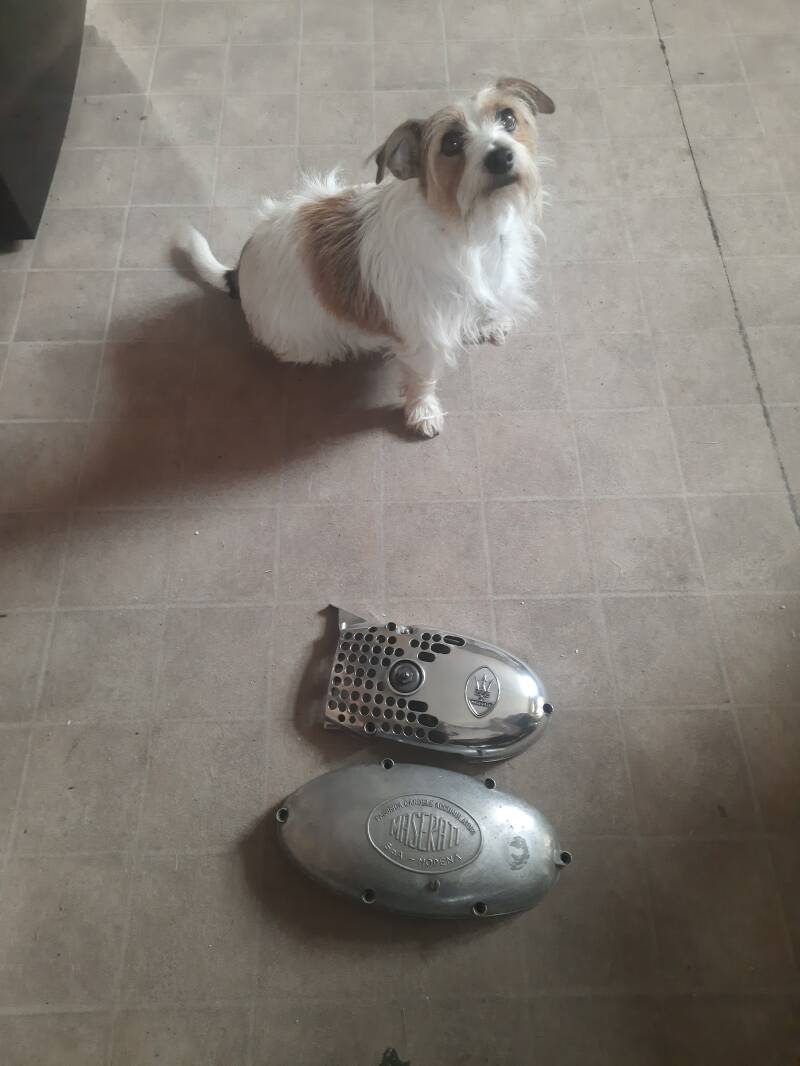
The dog is appreciating my work, she likes the comparison between the side that is done and the side that is as I got it. She wants me to do her food bowl next.
Add comment
Comments